Welcome
This codelab is designed to help you get started with Android development and become familiar with the basics. During this lab we will create a scrollable gridview of images loaded from the network.
Things we'll use
Here are the tools and utilities we will use in this lab:
- Android Studio - The IDE for developing Android applications
- Material Design Icon Generator - IDE plugin for generating Material Design Icon assets directly into the project
- Support Library - A series of libraries that provides extra support outside of the Android SDK for android development including backward compatibility for Material Design and other features and utilities.
- RecyclerView - a view for efficiently displaying large data sets by providing a limited window of data items.
- AppCompat - A library that includes support for material design user interface implementations.
- Picasso - A powerful image downloading and caching library for Android
Getting Started
Once you've installed Android Studio and Java you be presented with this screen:
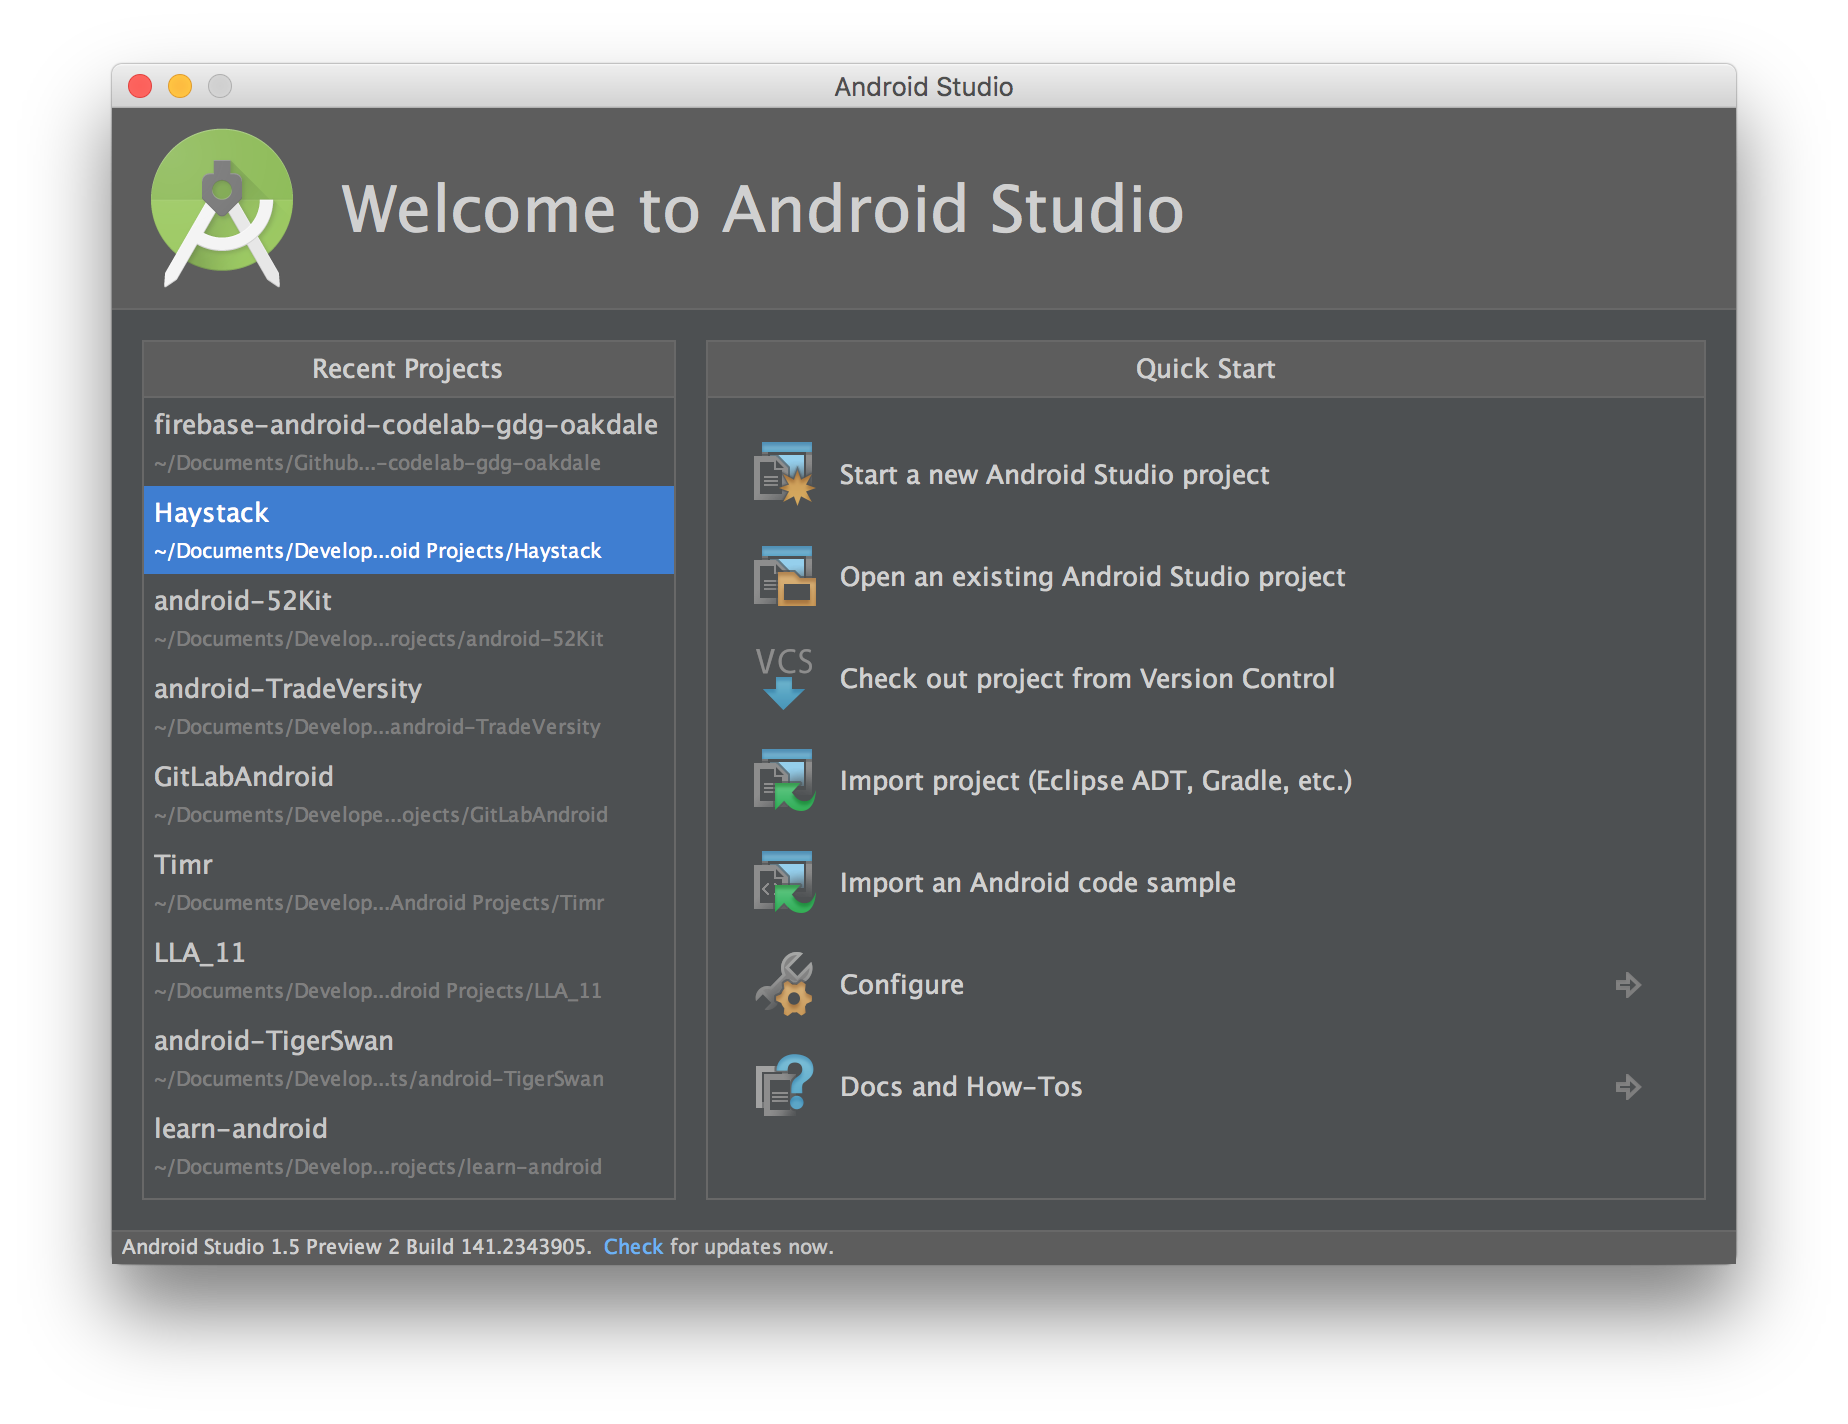
From here select Start a new Android Studio project and you will be presented with the screen where you will name your project and company domain (i.e.; usually your website, or github address, e.g.; r0adkll.com or r0adkll.github.io) that is used to generate your applications unique package name that is used as it's identifier when install on a device and in the Playstore.
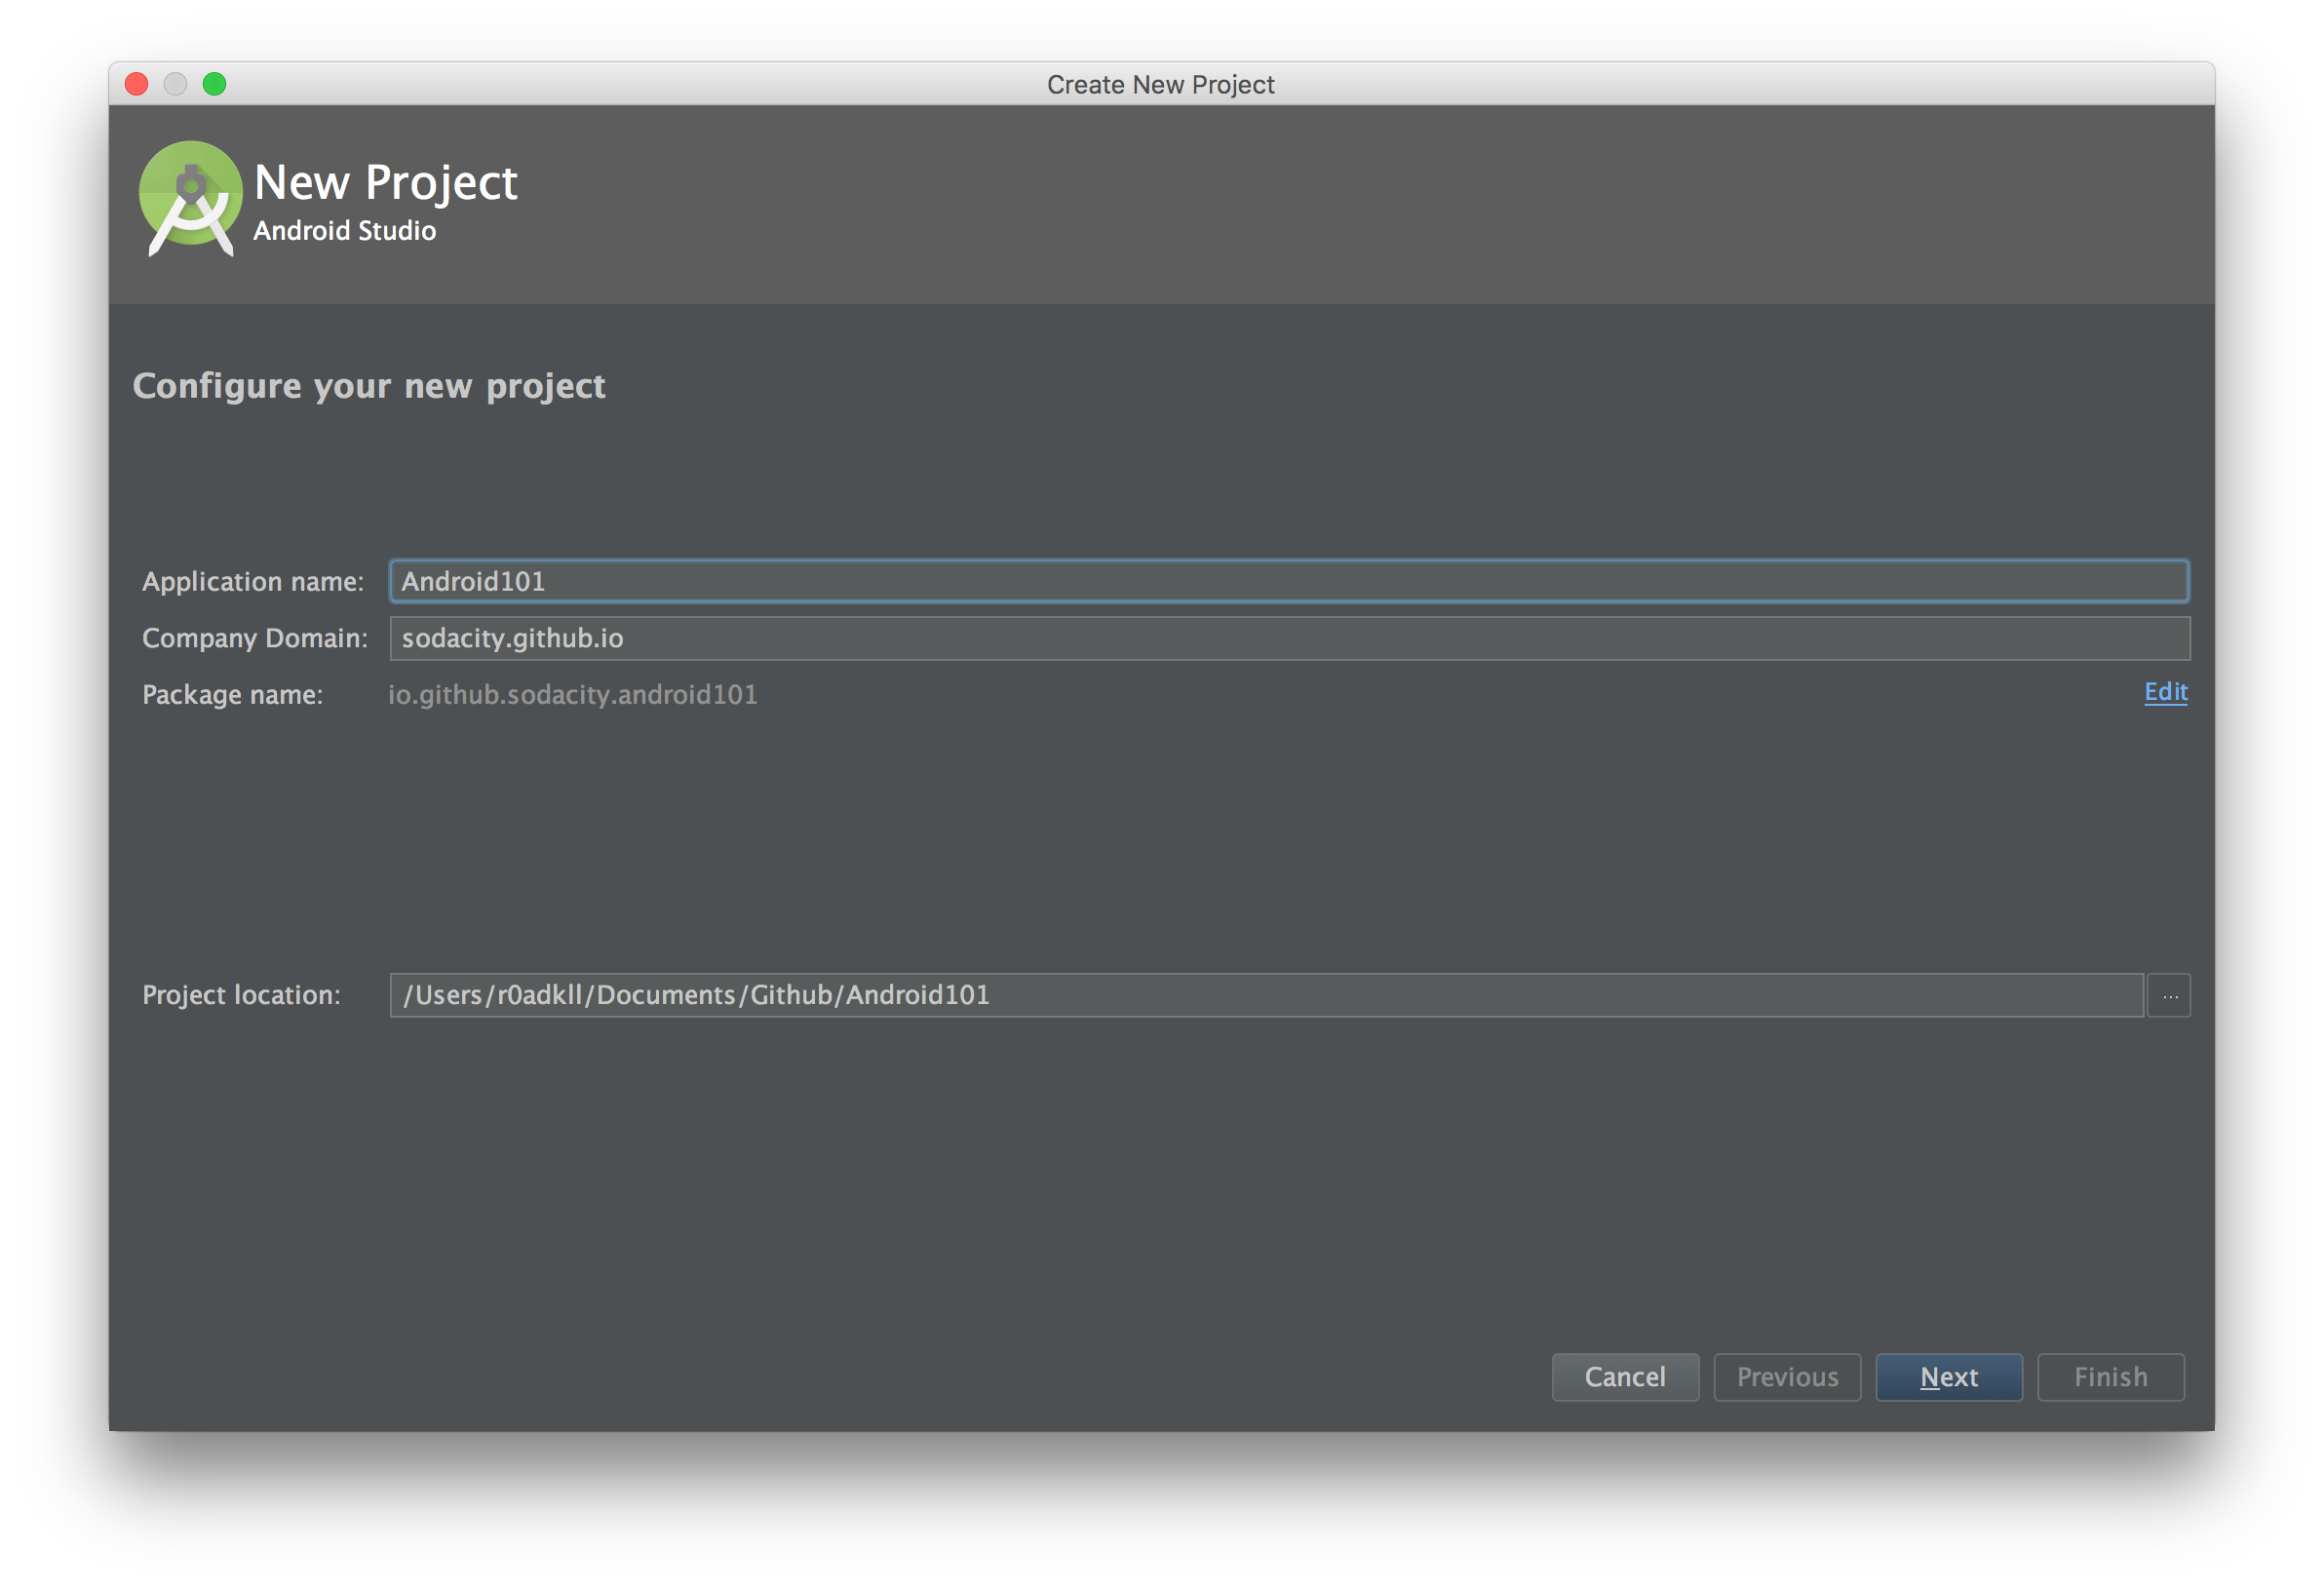
After entering your project name and domain, you will then be asked to select your minimum target Android SDK. The default is 16 (Jelly Bean 4.1) however I now start my applications at 17 (Jelly Bean 4.2) for the ease of development.
After selecting your minimum SDK you will be projected to add a template activity to the project (or none if you want to add it yourself) and here you will see a variety of quick start options but for now we will select the Blank Activity template to start.
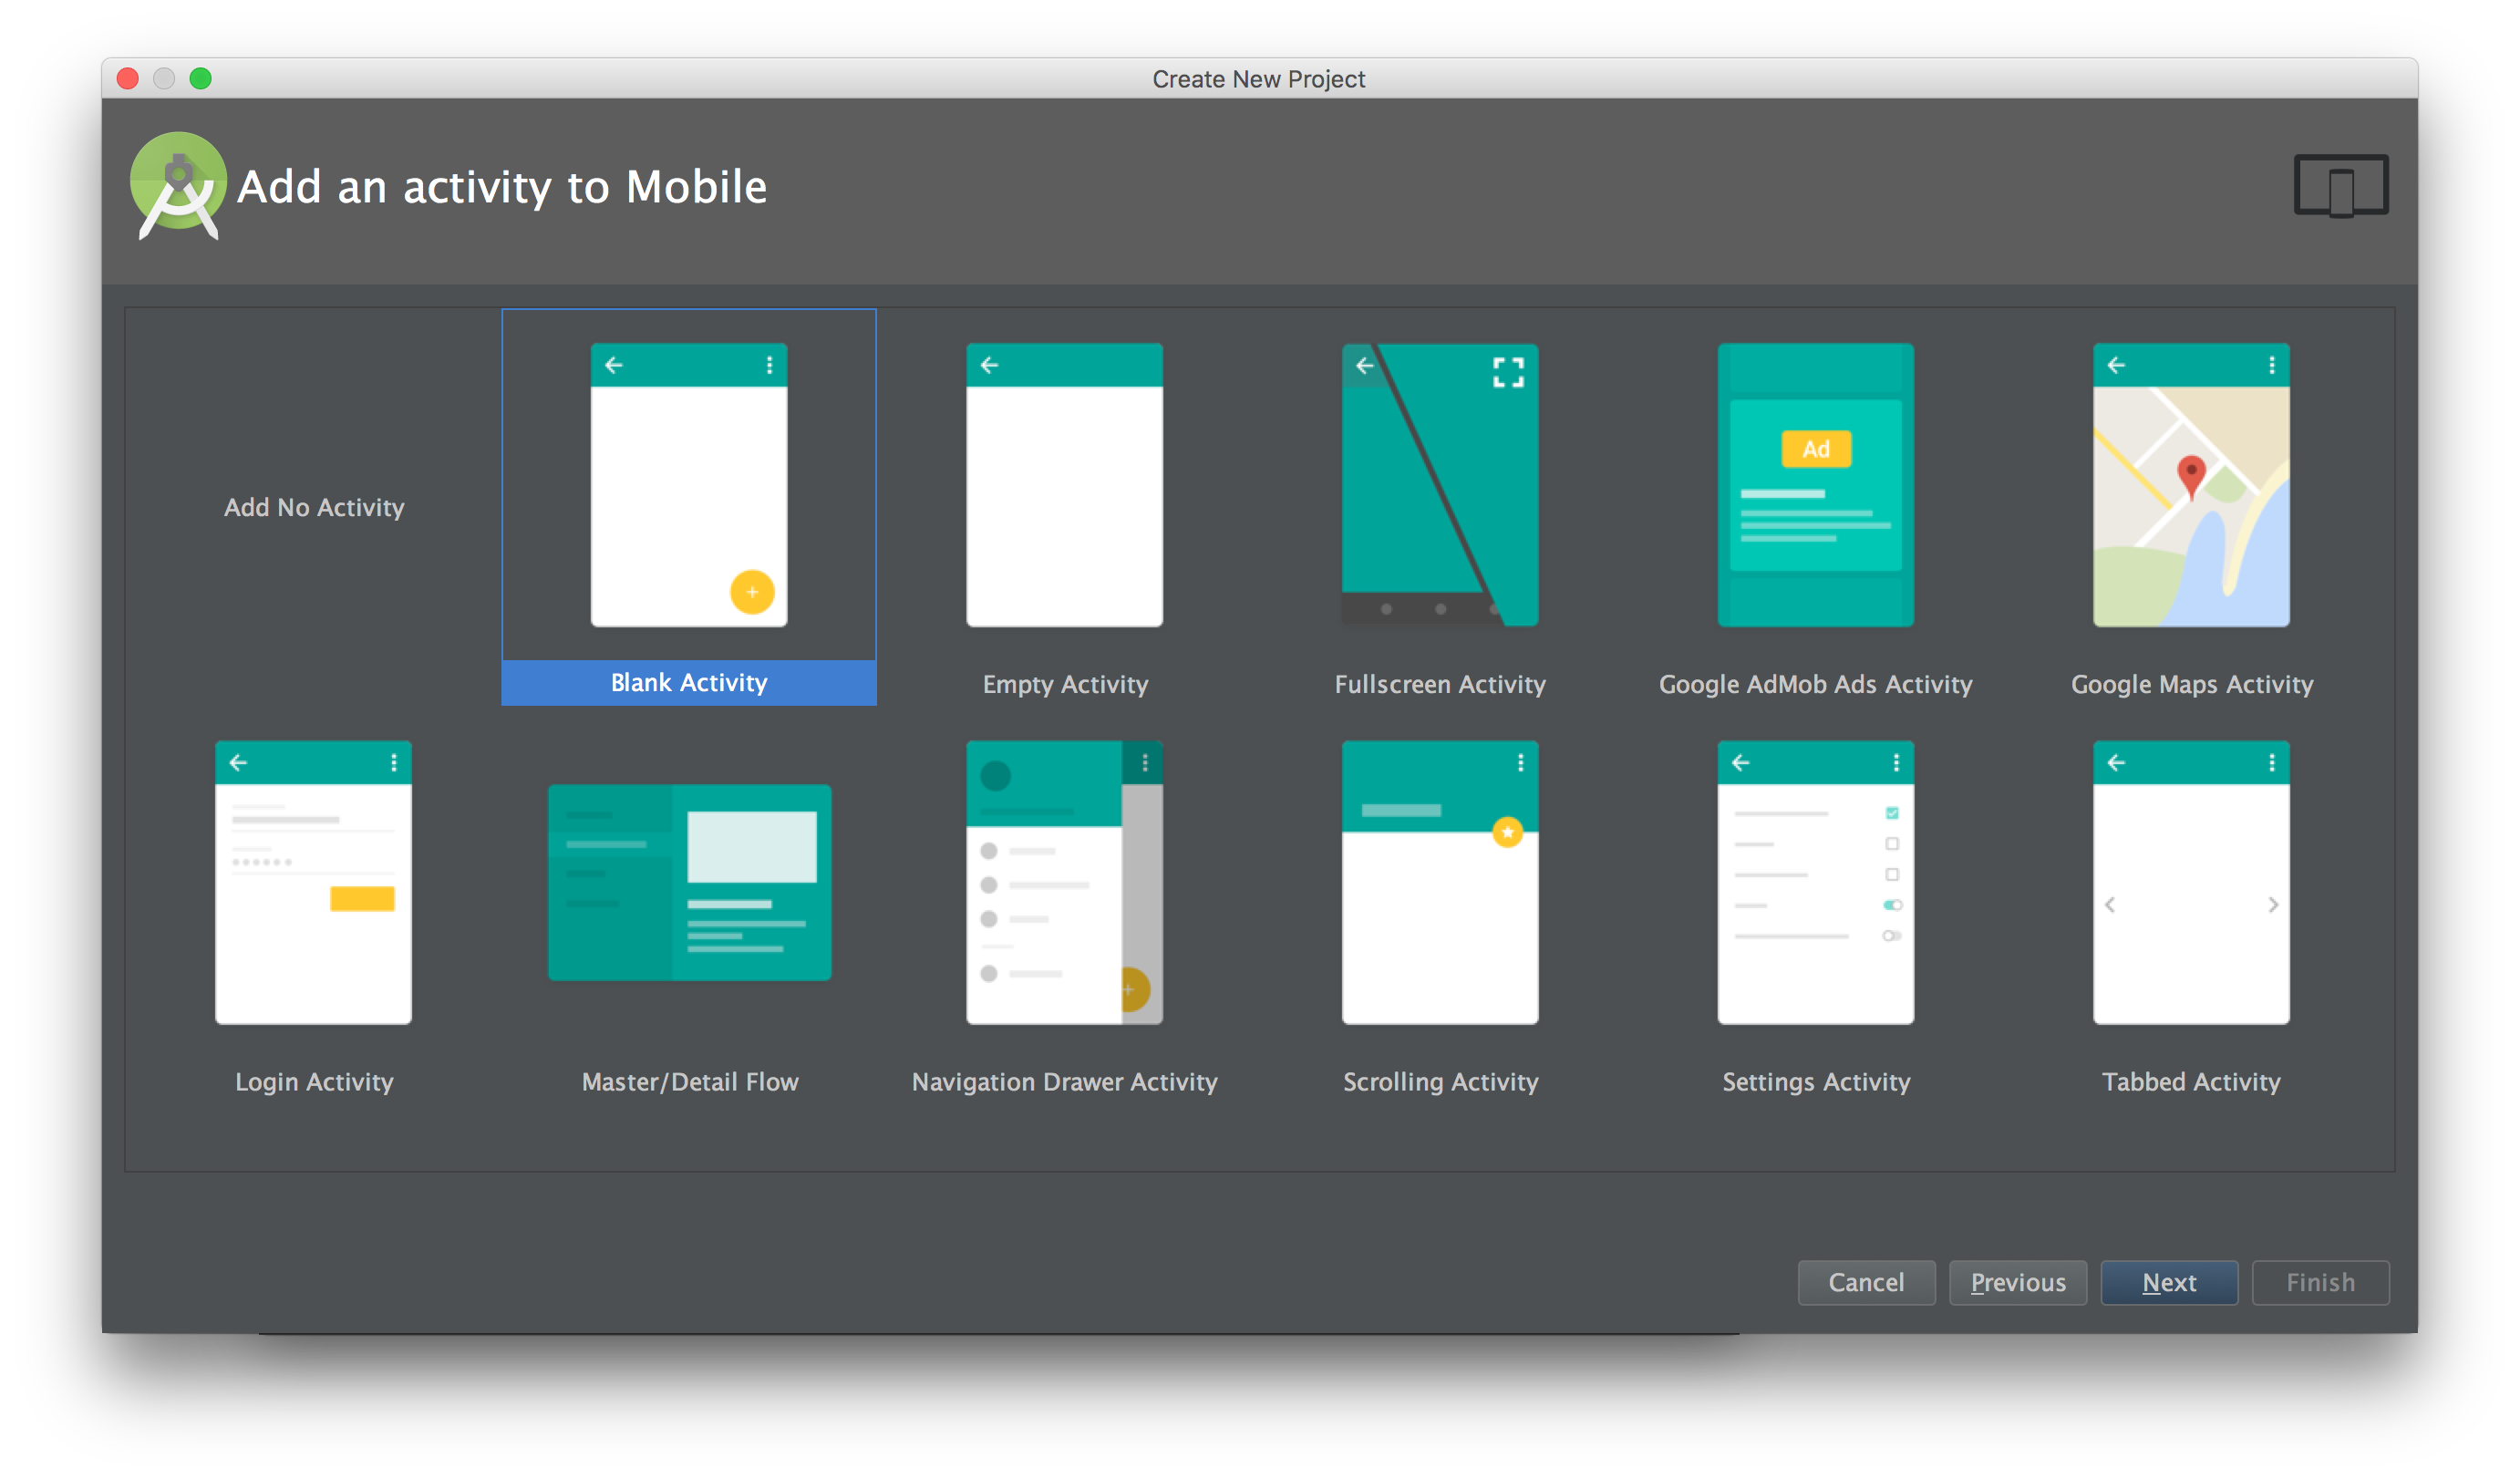
This template will generate an Activity class, a XML layout file for this activity and screen, and a XML layout for an option menu. You will be presented with naming these files in the following screen after continuing.
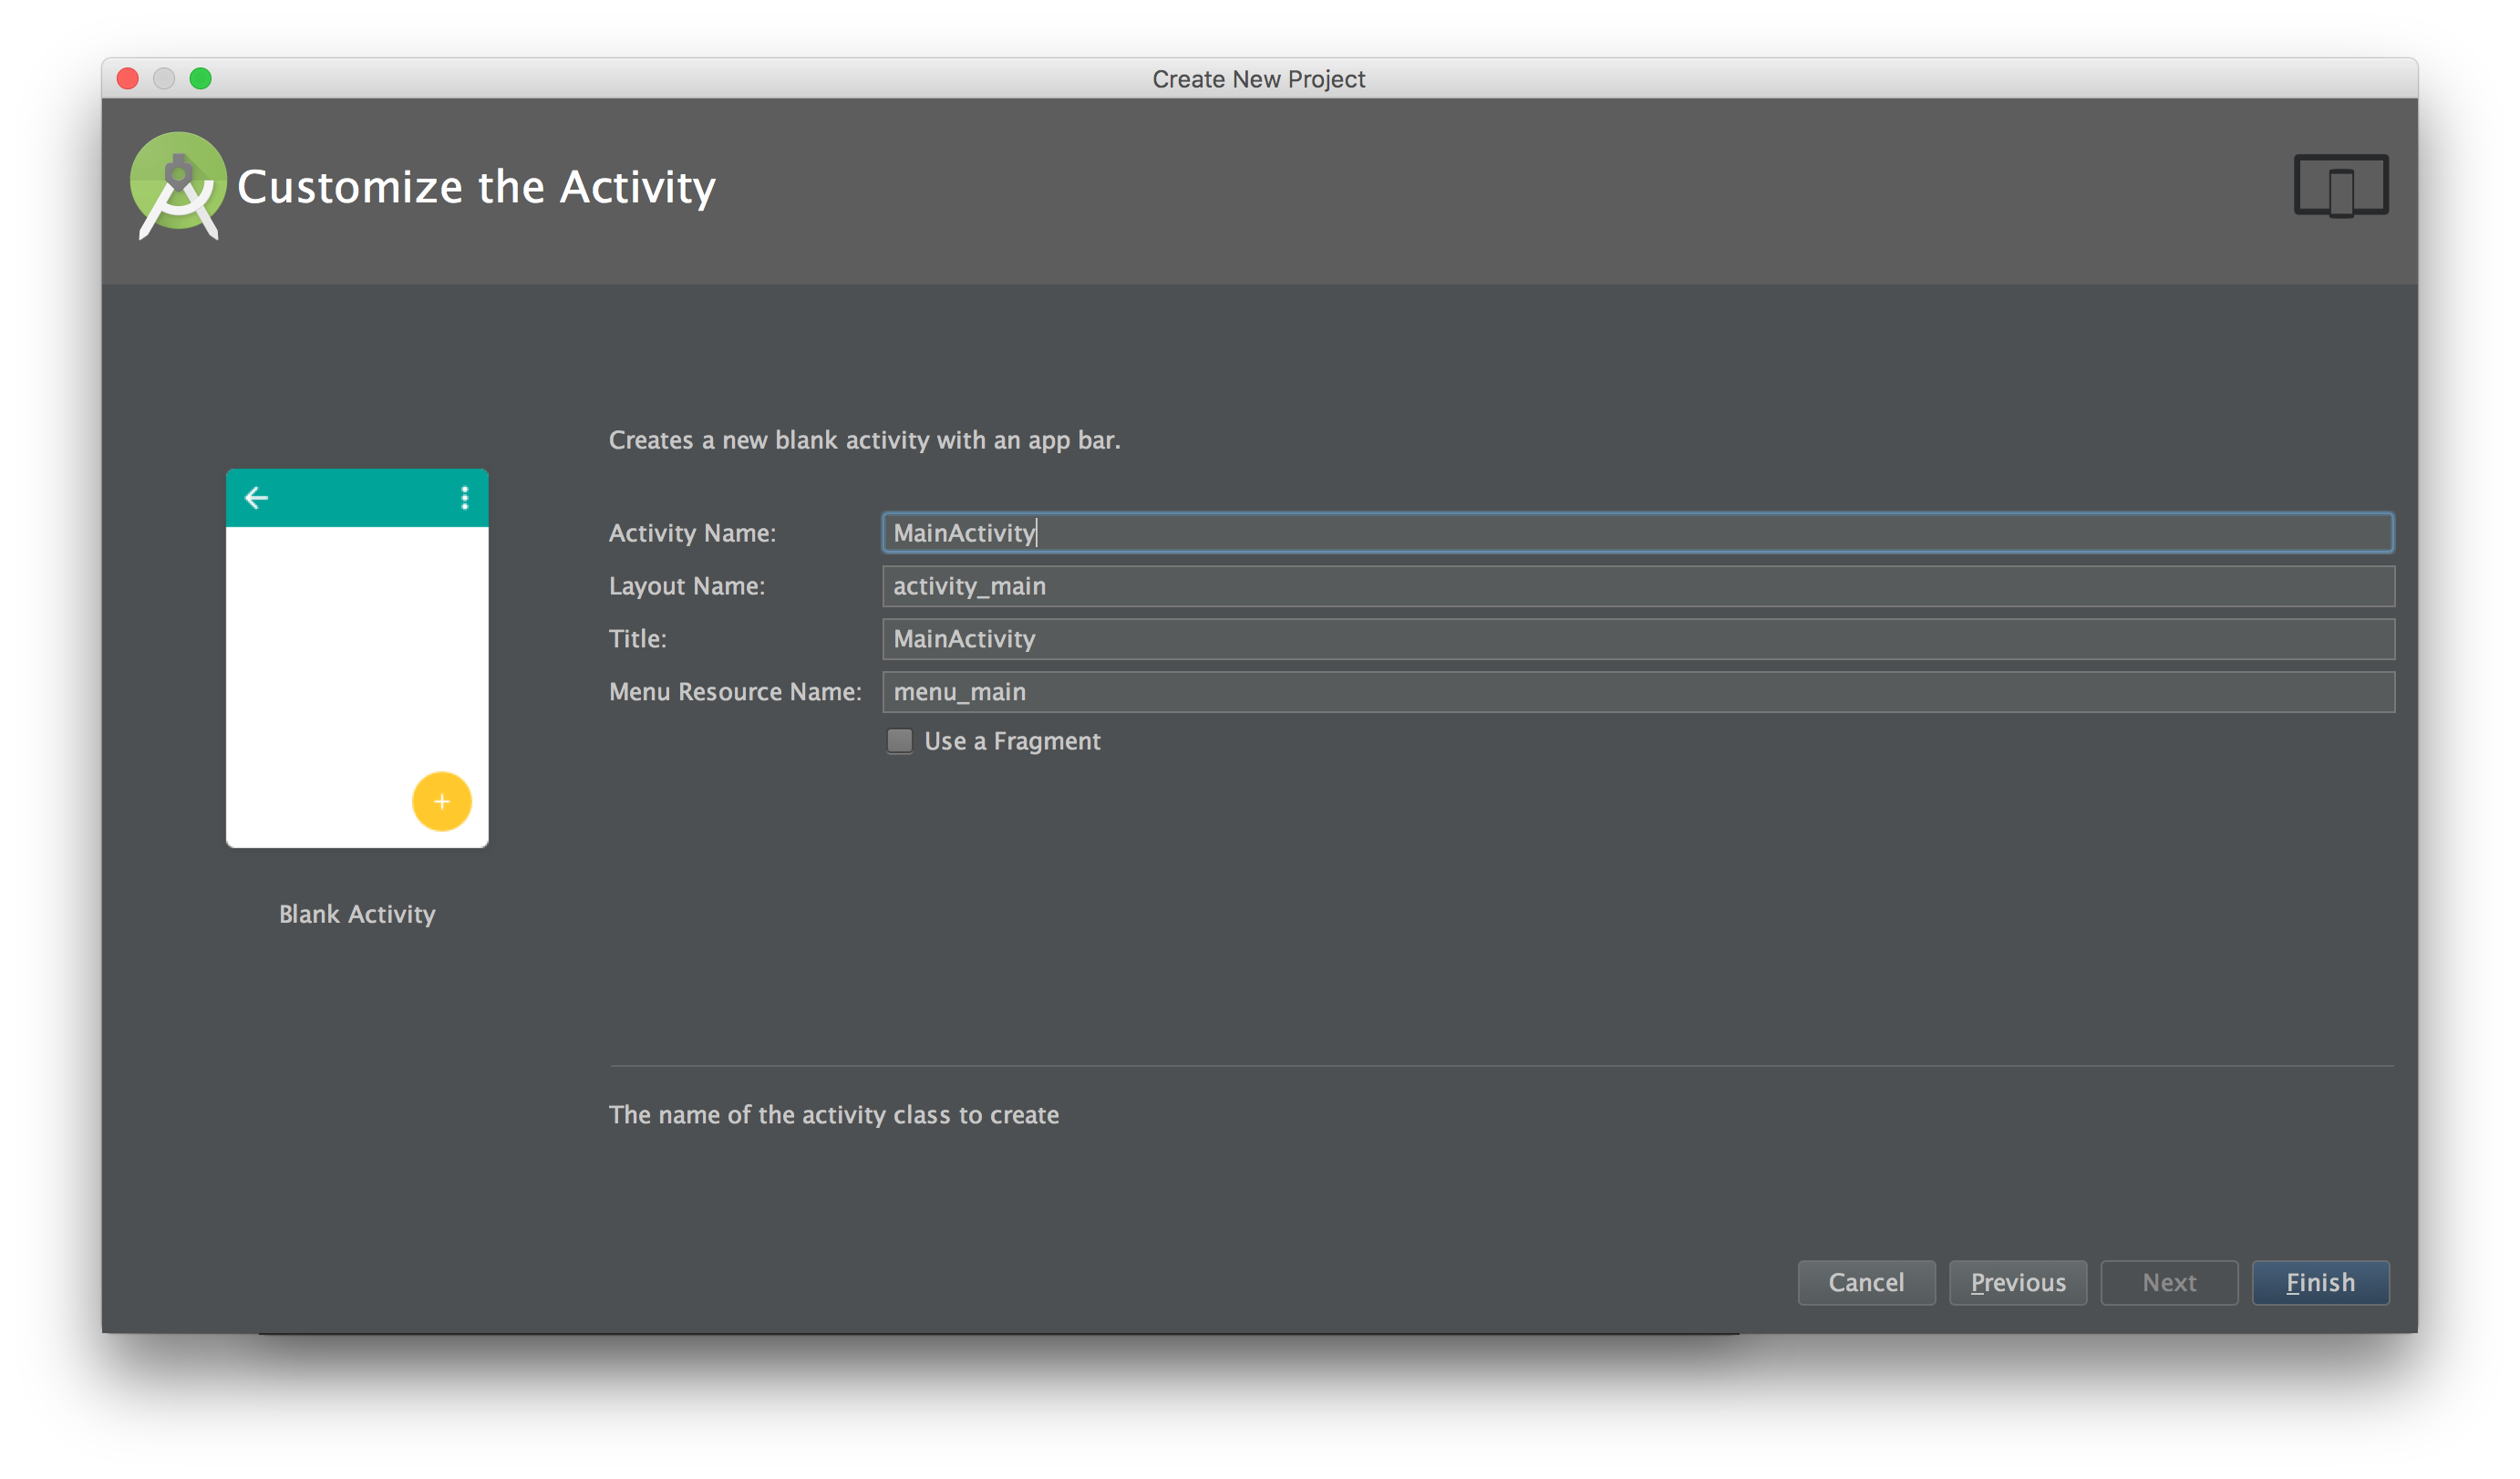
Once you select Finish Android Studio will create and open your new project which will look a little something like this:
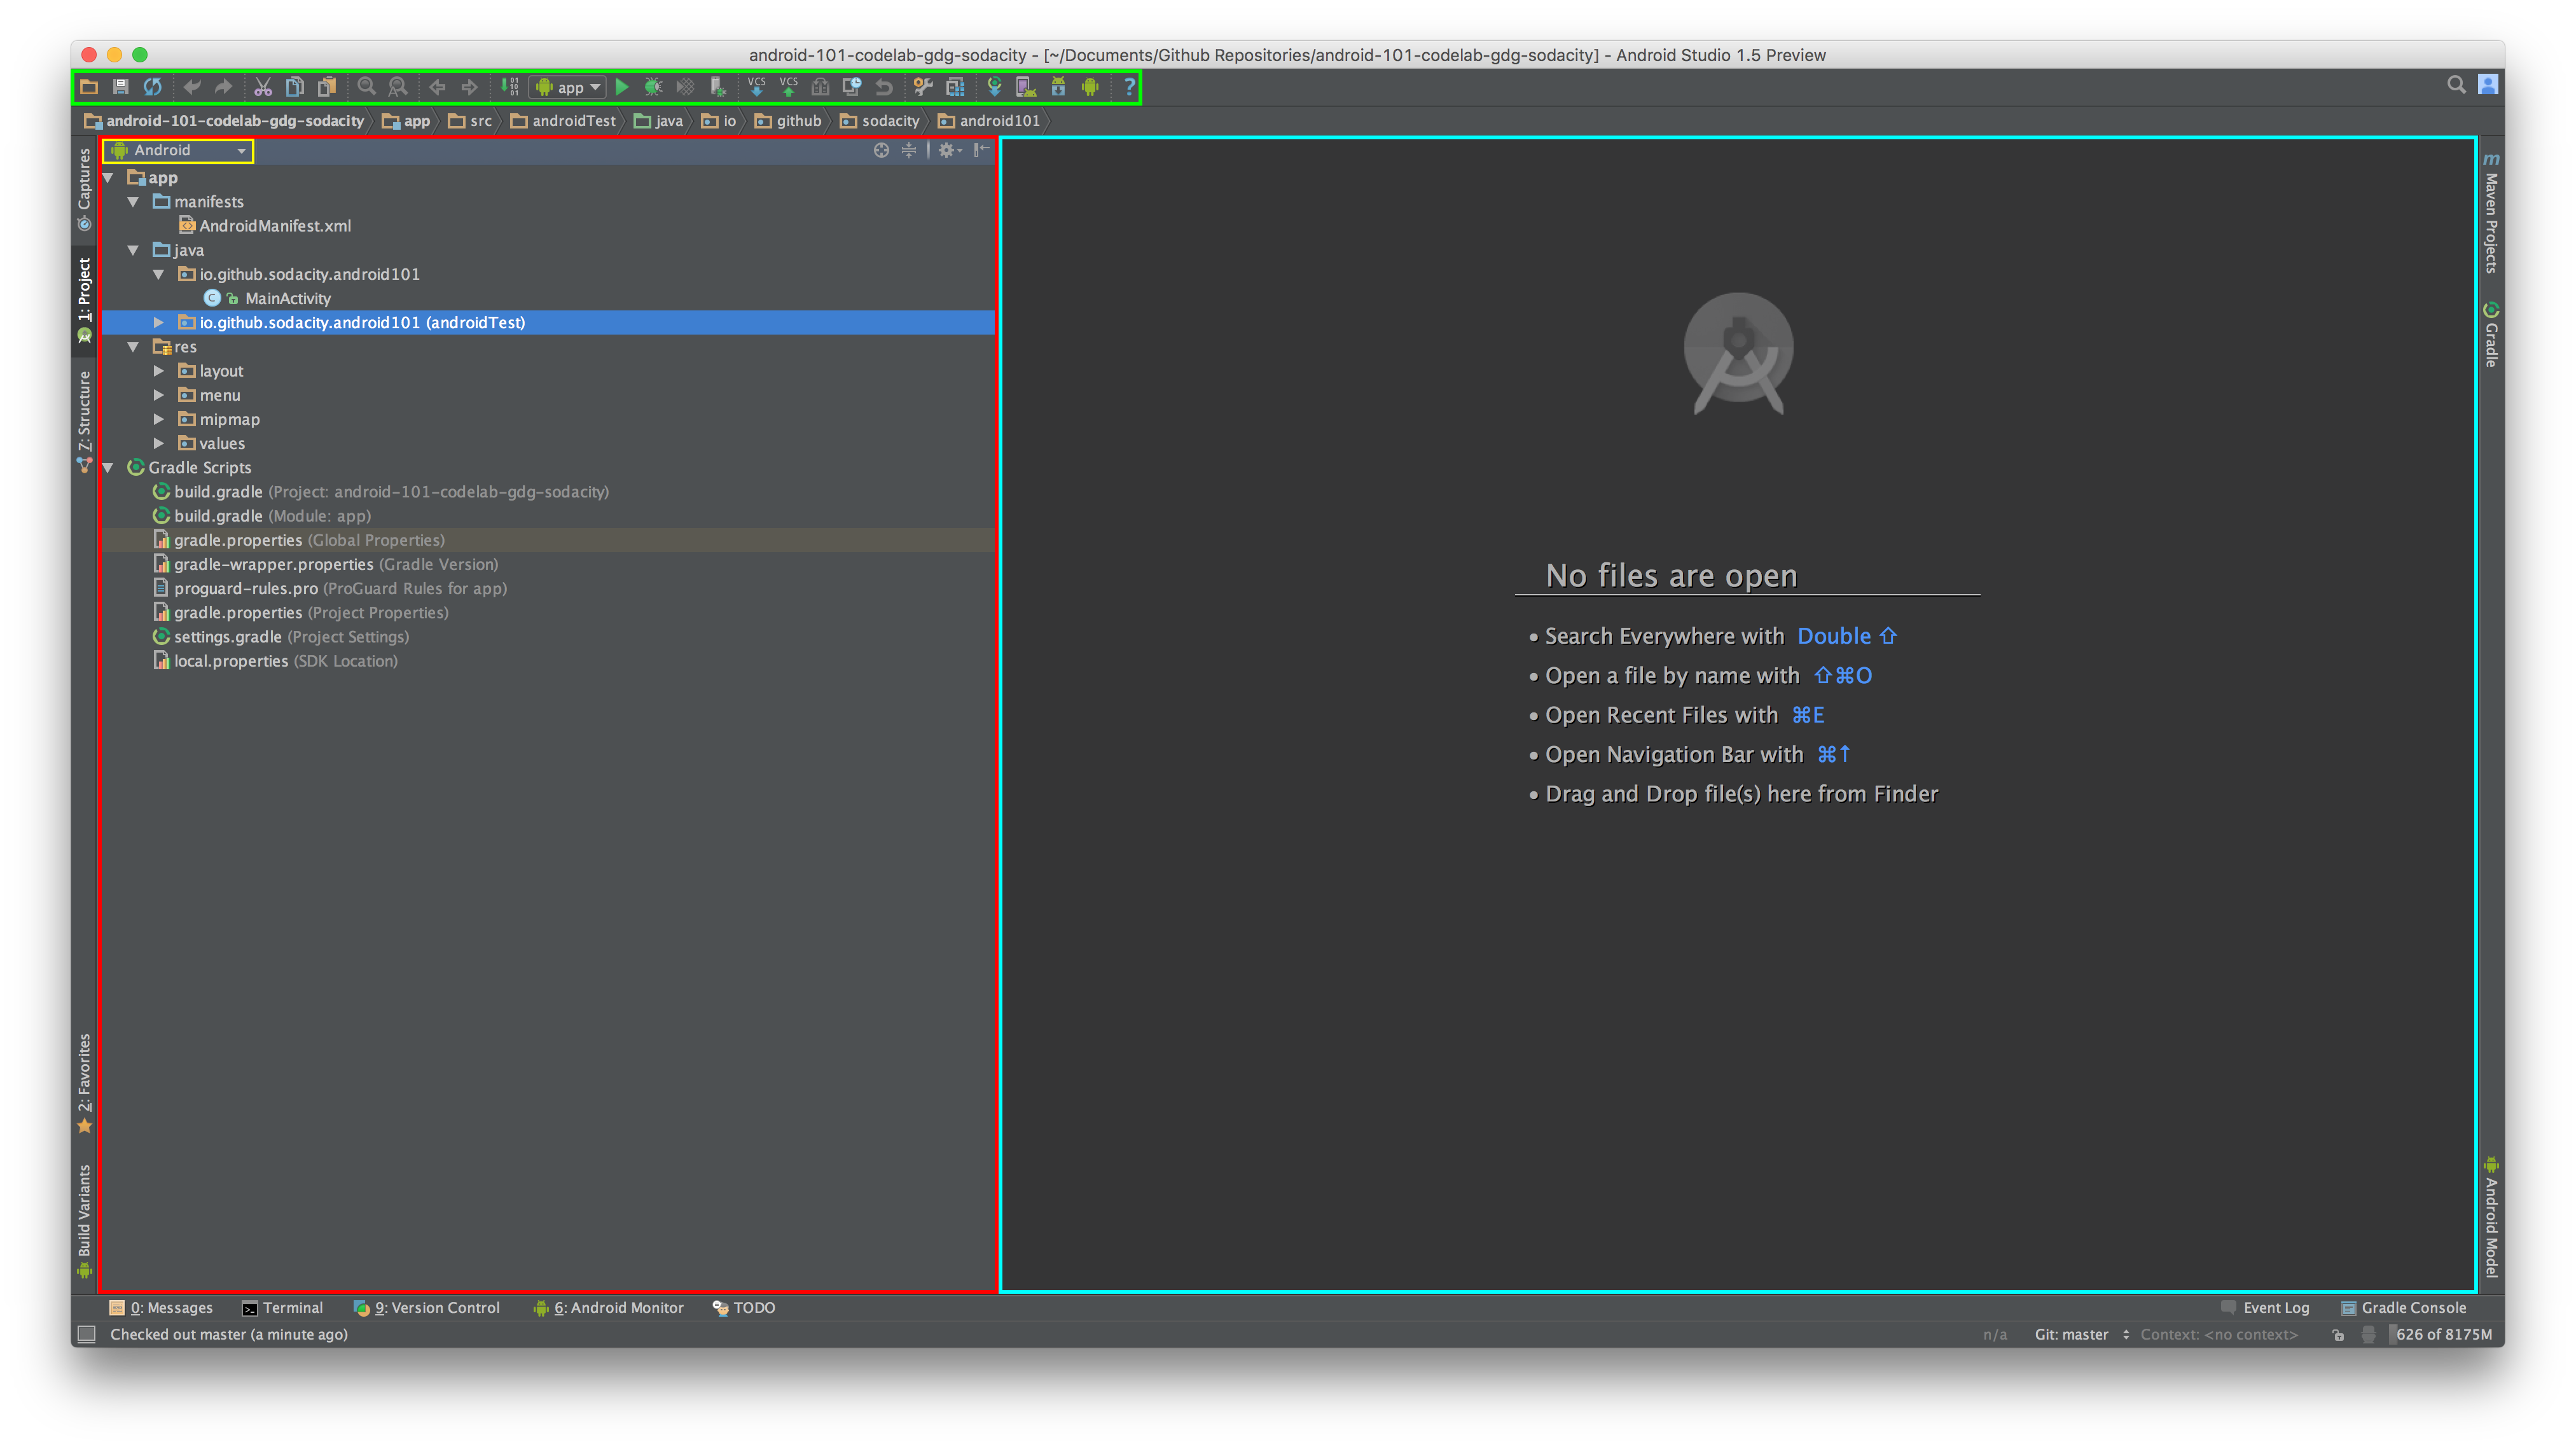
The window outlined in Red is your Project Structure which is the tree view of your entire project heirarchy. Within this window you can select between multiple different types of views, for example the default is the Android view which presents your projects files, resources, and configuration files in a more streamlined way cutting out the other files in the project that aren't directly need for development. These views are denoted in the Yellow outline. If you wish to just view the raw file tree then select the Project view.
The window outlined in Blue is your main editor window, here all your resource and source(read: java) files will appear for you to code and edit.
The window outlined in Green is the Toolbar this is where all your basic actions lie such as the basics (open, save, refresh, undo, redo, cut, copy, past) and shortcuts to build/run/debug your project, pull or push to version control, and sync your gradle configuration to the project and open the Android emulator device manager, Android project manager, and extra debugging tools.
Configuring
Now that we have created our project and become familiar with the basics of the IDE we can begin coding our project!
First, let's get familiar with the basics for every Android project:
build.gradle - Gradle build configuration script
If you look under root item Gradle Scripts in your Project Structure window you will see a list of gradle based files that define how our application is built, but for now we will only focus on the build.gradle file, the one that is followed by (Module: app). This is our projects main build configuration, and will look like this:
apply plugin: 'com.android.application'

android {
    compileSdkVersion 23
    buildToolsVersion "23.0.1"

    defaultConfig {
        applicationId "io.github.sodacity.android101"
        minSdkVersion 17
        targetSdkVersion 23
        versionCode 1
        versionName "1.0"
    }

    buildTypes {
        release {
            minifyEnabled false
            proguardFiles getDefaultProguardFile('proguard-android.txt'), 'proguard-rules.pro'
        }
    }
}

dependencies {
    compile fileTree(dir: 'libs', include: ['*.jar'])
    testCompile 'junit:junit:4.12'
    compile 'com.android.support:appcompat-v7:23.1.0'
    compile 'com.android.support:design:23.1.0'
}
I will step through and explain the individual elements of this script that are import to our application:
apply plugin: 'com.android.application'
Here we are applying the Android gradle plugin to the script that tells the build system how to build an Android application from the following defined configuration. (Alternatively if you are building a library project it would be apply plugin: 'com.android.library')
android {
    compileSdkVersion 23
    buildToolsVersion "23.0.1"

    ...
}
Here we set which android sdk version we want to compile with and with what version of the build tools we want to use. These values are set automatically for you when you create a new project, but as you maintain your project these values will need to be updated when a new version of Android or build tools are released.
android {
    ...

    defaultConfig {
        applicationId "io.github.sodacity.android101"
        minSdkVersion 17
        targetSdkVersion 23
        versionCode 1
        versionName "1.0"
    }

    ...
}
Here is our default configuration block that defines the basic attributes of the application:
-
applicationId- This is the packagename that we talked about earlier, the unique identifier for your application -
minSdkVersion- This is the minimum version of Android that you want your application to run on, this value was determined in the previous project setup process -
targetSdkVersion- This is the Latest version of android you plan on targeting. If you don't set this to the latest version of android that doesn't mean that it won't run on that latest, it just means you can't use any of the new features in the SDK introduced by the latest version. (i.e. if you target Lollipop you wont' get access to the Fingerprint API or the new Permission model). -
versionCode- This is your application's build number. Whenever you release updates this number will have to be larger than the previous release for the user to install it and for the PlayStore to accept it. -
versionName- The version name for your application, this is not required to be changed between updates.
android {
    ...

    buildTypes {
        release {
            minifyEnabled false
            proguardFiles getDefaultProguardFile('proguard-android.txt'), 'proguard-rules.pro'
        }
    }
}
Here is where our application's build types are defined. By default, the project includes debug and release where the debug build type is implicit and always defined. You can override it by adding a debug {} block under buildTypes.
dependencies {
    compile fileTree(dir: 'libs', include: ['*.jar'])
    testCompile 'junit:junit:4.12'
    compile 'com.android.support:appcompat-v7:23.1.0'
    compile 'com.android.support:design:23.1.0'
}
Lastly, we have our dependencies block where our external (or internal) dependencies are defined and subsequently loaded into our project. By default it is setup to compile and load any JAR files you put in a libs folder in the base of the app module. It also includes the App compatibilty and design support libraries for building the latest and greatest UIs that are backwards compatible.
Here is where you would add any third party libraries that you would want to use to make your development easier such as image loading libraries (Picasso), or networking libraries (OkHttp, Retrofit, Volley, etc...) or anything else you can find.
I did a presentation on this topic that goes more in depth about this part of the toolchain which you can find on Speaker Deck
AndroidManifest.xml
Every Android application contains an AndroidManifest.xml file which is essentially your application's table of contents, or index. It goes further than the build.gradle configuration to define more in-depth and internal aspects of your application. It will look something like this when you first create your application:
<?xml version="1.0" encoding="utf-8"?>
<manifest package="io.github.sodacity.android101"
          xmlns:android="http://schemas.android.com/apk/res/android"
    >

    <!--

        This is where you would define the permissions your application needs, such as Internet,
        Location access, access to the external file storage system, bluetooth, and so on...

    -->
    <!-- <uses-permission android:name"..." /> -->

    <!--

        The application definition. Here we specify the Application name('label') that the user sees,
        the application 'icon' displayed in the launcher, and the base theme.

    -->
    <application
        android:allowBackup="true"
        android:icon="@mipmap/ic_launcher"
        android:label="@string/app_name"
        android:supportsRtl="true"
        android:theme="@style/AppTheme"
        >

        <!--

            Each activity you create needs to be defined here under the Application definition
            where you specify the path to the activity relative to the package. You can also specify
            it's default label and override the base application theme.

        -->
        <activity
            android:name=".MainActivity"
            android:label="@string/app_name"
            android:theme="@style/AppTheme.NoActionBar"
            >

            <!--

                Activities can contain Intent Filters, i.e.; a hook for androids communication layer
                that can catch certain messages and display the activity in accordance. For example,
                the following intent filter tells the OS that this activity is the main one and to
                launch it when the user selects the application from the home screen or launcher.

            -->
            <intent-filter>
                <action android:name="android.intent.action.MAIN"/>
                <category android:name="android.intent.category.LAUNCHER"/>
            </intent-filter>
        </activity>

    </application>

</manifest>
This example contains documentation breaking down each aspect of this file to explain how it operates.
The Meat!
To reiterate, our objective with this lab is to build an application that displays a scrolling grid of placeholder images loaded from the internet. First we need to add some dependencies to the build.gradle for the support library for the RecyclerView which lets us build a scrollable grid that efficiently recycles views. We will also need to add an Image Loading library, Picasso, to seemlessly load images from the web.
Setup our app
So add these lines to the dependencies {...} block in your build.gradle file:
compile 'com.android.support:recyclerview-v7:23.1.0'
compile 'com.squareup.picasso:picasso:2.5.2'
Which should now look something like this:
dependencies {
    compile fileTree(dir: 'libs', include: ['*.jar'])
    testCompile 'junit:junit:4.12'
    compile 'com.android.support:appcompat-v7:23.1.0'
    compile 'com.android.support:design:23.1.0'
    compile 'com.android.support:recyclerview-v7:23.1.0'
    compile 'com.squareup.picasso:picasso:2.5.2'
}
Now that we have our dependencies defined and loaded we need to give our app permission to access the Internet. We define our applications permissions in the AndroidManifest.xml file. So add this line to your AndroidManifest file above the <Application ... tag:
<uses-permission android:name="android.permission.INTERNET" />
Awesome! Now we can load images from the internet!.
What's an Activity?
In an Android app every screen you see is backed by an Activity. You can think of it as a ViewController, or as a Screen. When building your UI can have have multiple screens per Activity by using an element called Fragments, or you can have one screen per Activity. For the purposes of this lab we will be using the latter as Fragments are a more advanced topic.
Setup our Activity
First, we will need to add the RecyclerView to our layout to be displayed in the Activity. Open the content_main.xml file found under res/layout. Once there, replace the <TextView... hello word view with this:
<android.support.v7.widget.RecyclerView
    android:id="@+id/recycler_view"
    android:layout_width="match_parent"
    android:layout_height="match_parent"

    android:padding="4dp"
    android:clipToPadding="false"
    />
So now your content_main.xml file should look something like this:
<?xml version="1.0" encoding="utf-8"?>
<RelativeLayout
    xmlns:android="http://schemas.android.com/apk/res/android"
    xmlns:app="http://schemas.android.com/apk/res-auto"
    xmlns:tools="http://schemas.android.com/tools"
    android:layout_width="match_parent"
    android:layout_height="match_parent"

    app:layout_behavior="@string/appbar_scrolling_view_behavior"
    tools:context="io.github.sodacity.android101.MainActivity"
    tools:showIn="@layout/activity_main"
    >

    <android.support.v7.widget.RecyclerView
        android:id="@+id/recycler_view"
        android:layout_width="match_parent"
        android:layout_height="match_parent"

        android:padding="4dp"
        android:clipToPadding="false"
        />

</RelativeLayout>
Next, in our MainActivity.java class we want to bind this RecyclerView so that we can set it's adapter and display the grid view of items. So in the activity class you'll want to define a RecyclerView field/variable so we can have a reference to it later, so add this line to the top of your class:
private RecyclerView recyclerView;
Next we want to bind the recycler view from the layout using the Activities findViewById(...) method, so add this line to the bottom of the protected void onCreate(Bundle savedInstanceState){...} method:
recyclerView = (RecyclerView) findViewById(R.id.recycler_view);
Now that we have bound our RecyclerView into our activity we need build a list of items to display and how to build an adapter for them to use in the RecyclerView.
Let's build our Model and Adapter
So we need to build a model object that will represent each cell in the gridview that contains a url to an image to load from the network. I've provided such object that randomly generates an image url from 3 different placeholder image websites:
public class Placeholder {

    public static final String[] PLACEHOLDER_SITES = new String[]{
            "http://www.placecage.com/%d/%d",
            "https://placekitten.com/%d/%d",
            "http://lorempixel.com/%d/%d"
    };

    public static String generateRandomPlaceholder(){
        Random r = new Random(System.nanoTime());
        String base = PLACEHOLDER_SITES[r.nextInt(PLACEHOLDER_SITES.length)];
        int width = r.nextInt(100) + 300;
        int height = r.nextInt(100) + 300;
        return String.format(base, width, height);
    }

    private final String url;

    public Placeholder(){
        url = generateRandomPlaceholder();
    }

    public String getUrl() {
        return url;
    }

}
Every time you create a new instance of this object, i.e.; new Placeholder() it will generate a random image url from the 3 different sources and varing width and height to ensure the services don't send us too many duplicates.
Now that we have our model object we need to build the adapter that tells our RecyclerView how to build and display a list of these objects. For that we need to create a class that extends RecyclerView.Adapter<VH> which is responsible for creating RecyclerView.ViewHolder objects which are wrapper objects for our item layout xml file and view bindings that the RecyclerView can efficiently create, re-use, and destroy.
Before we build our adapter we need to create our layout that will be used to display each of our objects in the adapter. We'll want to use just an ImageView widget to display our image from the web, so our layout, called item_layout_placeholder.xml in the res/layout folder will look something like this:
<ImageView
    xmlns:android="http://schemas.android.com/apk/res/android"
    android:id="@+id/image"
    android:layout_width="match_parent"
    android:layout_height="96dp"
    android:scaleType="centerCrop"
    android:layout_margin="4dp"

    android:foreground="?attr/selectableItemBackground"
    />
Our view here will display each cell at a height of 96 density independant pixels, which really isn't optimal as we want to display image image as a square for better consistancy and UX. So we need to subclass the ImageView to force it's height to be the same as the width. Add this class SquareImageView.java to your package:
public class SquareImageView extends ImageView {
    public SquareImageView(Context context) {
        super(context);
    }
    public SquareImageView(Context context, AttributeSet attrs) {
        super(context, attrs);
    }
    public SquareImageView(Context context, AttributeSet attrs, int defStyleAttr) {
        super(context, attrs, defStyleAttr);
    }

    @Override
    protected void onMeasure(int widthMeasureSpec, int heightMeasureSpec) {
        super.onMeasure(widthMeasureSpec, heightMeasureSpec);

        int size = getMeasuredWidth();
        setMeasuredDimension(size, size);
    }
}
Now we need to update the layout XML file to use this custom widget, so it will now look like this:
<io.github.sodacity.android101.SquareImageView
    xmlns:android="http://schemas.android.com/apk/res/android"
    android:id="@+id/image"
    android:layout_width="match_parent"
    android:layout_height="wrap_content"
    android:scaleType="centerCrop"
    android:layout_margin="4dp"

    android:foreground="?attr/selectableItemBackground"
    />
Now that we have our layout we need a ViewHolder that binds the SquareImageView from the layout into code. The resulting class will look like this:
static class PlaceholderViewHolder extends RecyclerView.ViewHolder{
    SquareImageView image;
    public PlaceholderViewHolder(View itemView) {
        super(itemView);
        image = (SquareImageView) itemView;
    }
}
Now we can create our Adapter subclass, PlaceholderRecyclerAdapter.java, which once created should look like this:
public class PlaceholderRecyclerAdapter extends RecyclerView.Adapter<PlaceholderRecyclerAdapter.PlaceholderViewHolder> {

    @Override
    public PlaceholderViewHolder onCreateViewHolder(ViewGroup parent, int viewType) {
        return null;
    }

    @Override
    public void onBindViewHolder(PlaceholderViewHolder holder, final int position) {

    }

    @Override
    public int getItemCount() {
        return 0;
    }

    static class PlaceholderViewHolder extends RecyclerView.ViewHolder{
        SquareImageView image;
        public PlaceholderViewHolder(View itemView) {
            super(itemView);
            image = (SquareImageView) itemView;
        }
    }

}
We'll need to give this class a reference to the Activity to use it's layout inflater, and we'll also need to maintain a List<> of Placeholder objects that it will use to display it's content. So add these two variables to the top of the class:
private Activity activity;
private List<Placeholder> items;
Then add this constructor that gives the adapter the reference to the Activity when it is instanitiated and initializes our array for the model objects:
public PlaceholderRecyclerAdapter(Activity activity){
    this.activity = activity;
    this.items = new ArrayList<>();
}
Now we need tell the adapter's getItemCount() method how many items are in the data structure at any given time:
@Override
public int getItemCount() {
    return items.size();
}
Next we want to fill out the onCreateViewHolder method to tell the adapter how to construct viewholders whenever it needs them by inflating the item layout and passing it to the class we made earlier:
@Override
public PlaceholderViewHolder onCreateViewHolder(ViewGroup parent, int viewType) {
    View view = activity.getLayoutInflater().inflate(R.layout.item_layout_placeholder, parent, false);
    return new PlaceholderViewHolder(view);
}
Next we need to bind our modal objects to the previously constructed view holders. First we need to get the modal object at the given position int position by inserting this line into the method:
Placeholder item = items.get(position);
Next we what to load the image at the item's url path into the image view. To do this we will use the Picasso library we imported earlier in our build.gradle file. Picasso provides a very streamline api for loading images directly into images, which in our case will look like this:
Picasso.with(activity)
       .load(item.getUrl())
       .placeholder(new ColorDrawable(Color.GRAY))
       .into(holder.image);
where we pass it the url of the image to load, a color to use as a placeholder until it loads, and the ImageView to load it into and that's it! The image will be downloaded, cached, and automatically applied to the ImageView we passed. Magical!!
Now that we have completed the necessary methods of the adapter for it to function we need to add some methods so we can pass updated data modals, or remove them, from the adapter. Add these methods to the class:
public void addAll(List<Placeholder> placeholders) {
    items.addAll(placeholders);
}

public void add(Placeholder placeholder) {
    items.add(placeholder);
}

public void clear() {
    items.clear();
}
Pull it all together
Now that we have our data model and RecyclerView adapter we can now bring it all together and bind it to the RecyclerView. First, we need to create a local reference to the adapter by adding this line to the top of the class:
private PlaceholderRecyclerAdapter adapter;
then we need to create a new instance of this adapter by adding this line to the bottom of the onCreate(...) method in the Activity class:
adapter = new PlaceholderRecyclerAdapter(this);
Now we can setup our RecyclerView with this adapter and set it up to be a gridview by the following 2 lines:
recyclerView.setAdapter(adapter);
recyclerView.setLayoutManager(new GridLayoutManager(this, 3));
Now our recyclerview is bound to our adapter and setup to be a gridview with 3 columns. Feel free to play around with this number if you want to have 2 columns, or 6.
Next we need to create a set of placeholder items to give the adapter and view to display, so we will create 20 objects and add it to the adapter and notify it that it's underlying data structure has changed:
List<Placeholder> placeholders = new ArrayList<>();
for (int i = 0; i < 20; i++) {
    placeholders.add(new Placeholder());
}

adapter.addAll(placeholders);
adapter.notifyDataSetChanged();
Now you should be able to run the project and see a grid of random images that load from the network.!!! WHOOOO!! [Pat self on the back]
BONUS ROUND!!!
Here are some extra things todo if time permits:
- Add a new placeholder model object to the adapter when the user presses the FloatingActionButton.
- Add an option menu to the
res/menu/main_menu.xmlfile that clears out the adapter. - Add a click listener to each cell that shows a snackbar when the user clicks it.
- Change the theme colors in
res/values/styles.xml(i.e.; colorPrimary, colorPrimaryDark, and colorAccent) - Add some material design icons for the menu item and floating action button with the Material Design Icon Generator